![]()
BACKGROUND:
In 2005, shortly after my son was born, I realized that I needed another source of income. I had been making somewhat of a living playing gigs around New York City as a bass player which included playing in musical theater pit orchestras, gospel churches, studio sessions with singer/songwriters and even some weddings. It was clear that we wouldn’t be able to stay in our one bedroom apartment with a new baby and having turned 30, I decided I needed to earn more.
I had studied history in college and found a job as a history tutor for some of Manhattan’s wealthiest families. Since history is really the only other thing I consider myself decent at, besides music, I actually enjoyed going to students’, often palatial, townhouses and apartments and teaching them the basic facts of American, European or even World History. I often found their assignments pretty fascinating and a chance to take my mind off music and use another part of my brain. Moreover, the job paid well and had flexible hours which allowed me to artistically focus on projects which didn’t pay as well and put my time into diving into Brooklyn’s amazing indie/electronic scene of the 00’s.
At times, while I held that job, we would get students who wanted history tutoring but were living outside of New York City. I remember actually doing phone lessons which were actually possible, but not optimal. Skype did exist between 2005 and 2010, however, in those days, it was a bit too unreliable for teaching.
In the past 10 years, all of this has changed rapidly and for the past decade, thanks to the development of the necessary technologies, I’ve found ways to teach online both to individuals or groups. In 2016, for example, I was able to move with my family to Bologna, Italy for three months and finance the stay by teaching remotely to the United States. As I write this in March of 2020, the COVID-19 virus has shut down my Music Performance with Laptops class at New York University’s Clive Davis Institute of Recorded Music and I will be teaching it online. Having done this so many times over the past decade, I have no doubt that I’ll be able to pull this off.
I imagine that in these strange times, there are more educators like myself who are being forced by the circumstances to give classes online and I imagine that it must be new to some of you. Therefore, I wanted to share some techniques for teaching music production online since it’s a little bit more complex than simply hopping on a chat, however, it’s still pretty simple. Even for those of you who are not teaching music production online, hopefully this may give you some tips for presenting classes virtually with some of the most accessible platforms.
THE GENERAL RULES FOR TEACHING ONLINE:
In order to successfully run a class online, there are 7 things that I recommend:
1. A Hard-wired connection/strong wi-fi: The ideal situation is to use an ethernet cable from your modem directly to your computer. If you don’t have this opportunity, I would recommend at least 10 megabites per second for both upload and download speeds. If you want to check your internet connection speed for free, simply click here. Do not use any kind of public wifi – it’s often overloaded and slow.
2. Microphone: You can always use your laptop mic, but it’s never truly ideal. You’re even better off even with the ear buds/mic headset that come with an iphone. There are many possible headsets out there as well. For highest fidelity, the classic podcast mic is the Shure SM7B, however, this requires an additional sound card to get the audio into your computer.
3. Webcam: (Built in/External): I generally use my built in webcam on my Macbook Pro, however, for certain applications an external could be useful. Be sure to position your self in the center of the screen looking directly at the camera.
4. Well-lit Room (Illuminate Your Face): This is actually quite important for online teaching since poor lighting makes it hard for others to see you and can give a creepy atmosphere to your online presentation.
5. Distraction Free Background: This is important as well, particularly since you may have strange and quirky stuff around that people begin to focus on more than what you’re saying. There are options within Skype to blur your background or Zoom to create a virtual background. I’d encourage you to use these unless, the room background is something you want in the picture (i.e. teaching music production from a music studio)
6. Quiet Location: This is crucial. You never want to do an online class or meeting from a cafe or noisy environment.
7. Test Out Your Set Up: If you’re new to this or using some new software, I’d recommend testing out your set-up first with a family member/friend to be sure that everything works.
HOW TO TEACH MUSIC PRODUCTION ONLINE:
To specifically teach music production, you need three pieces of software:
- The DAW
- A Virtual Mixer
- A Chat Platform
Since the DAW (Digital Audio Workstation) is something I’m going to assume every music producer has, I want to discuss my experiences with the Virtual Mixer and the Chat Platform.
The Virtual Mixer:
The trickiest part of teaching music production online is that you need to simultaneously broadcast your voice and your DAW, in my case mostly Ableton Live. It is quite difficult to do this in the audio preferences of Skype alone, for example. The key thing then is to use another piece of software to serve as a virtual mixer which will take in two different audio sources and output a single audio channel that can be then routed to Skype or whichever chat platform you choose.
My favorite piece of software for this is Loopback Audio by Rogue Amoeba. This accomplishes the job beautifully, however, it only works for Mac. I did some research for PC users and I did find something roughly equivalent called Virtual Audio Cable
Loopback Audio 2 is pretty easy to set up and you can check out the graphics below to see how I do it.
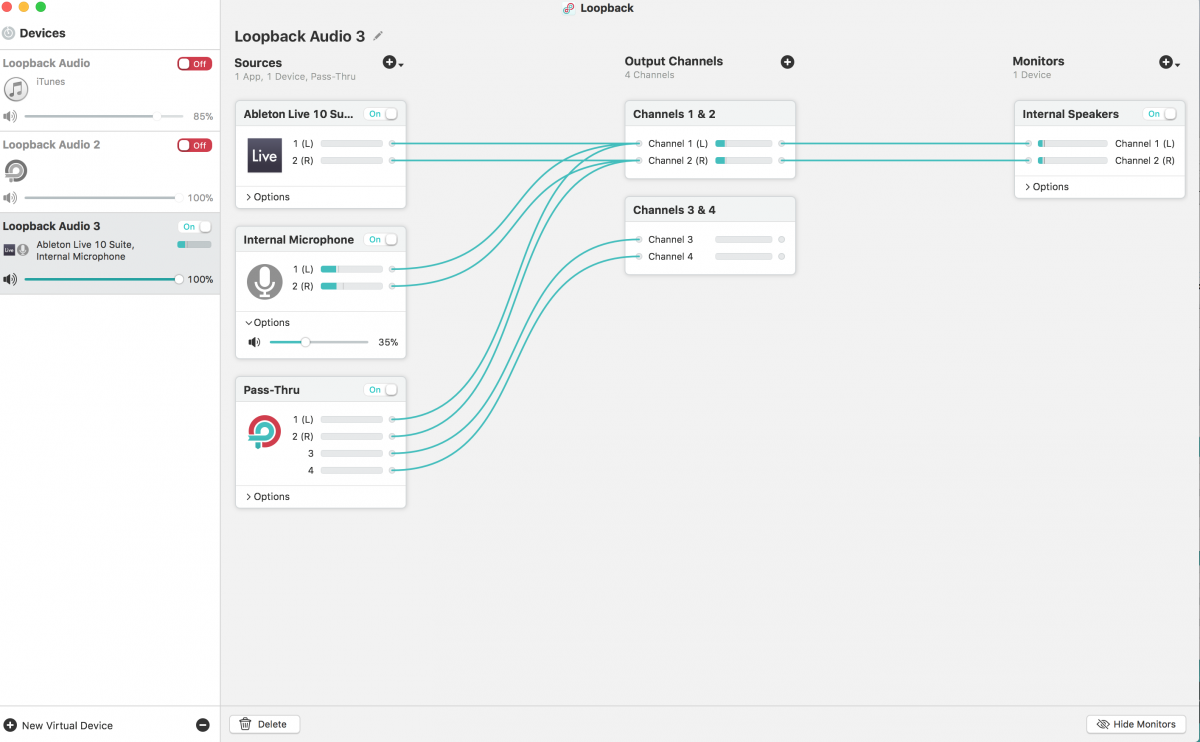
Essentially in the “Sources” section, I check on the + sign and it will bring up a list of applications that can output audio. (See below)
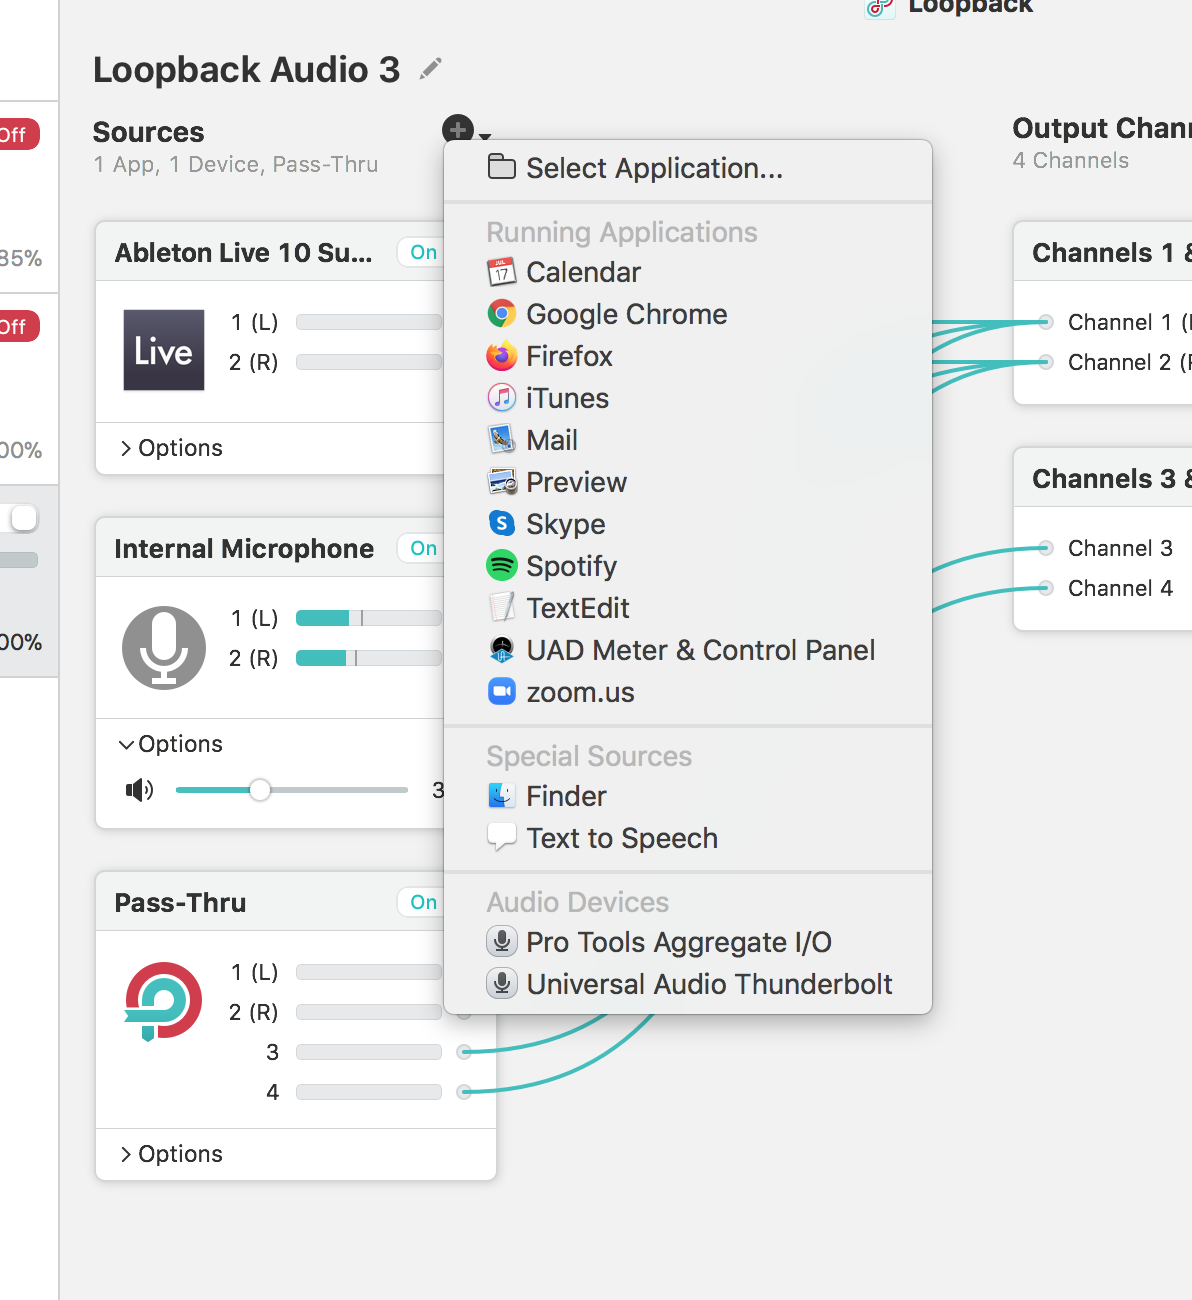
You then want to send all of the sources to Output channels 1 & 2. When I teach online, this means primarily the internal microphone and the audio from the DAW (Ableton Live in this case).
When you open the chat platform, in this case Skype, you simply take the audio input from Loopback Audio and you can now speak into your laptop mic at the same time as you are playing audio from your DAW. In Skype, you would go to the Settings and there you would open the Audio & Video tab and then set the audio in to Loopback Audio
(See below)

The Chat Platform
I’ve used 3 platforms, Skype, Google Hangouts and Zoom. I want to discuss their advantages and possible disadvantages. Also, how they can be useful in different situations. A chat platform needs to have two particularly important features. The first is the ability to Share The Screen and the second important feature is the Ability To Rout in a Virtual Mixer. I want to share a couple of pieces of software that I’ve used and for each, I will show you how to accomplish these important functions.
Skype: I have used Skype quite a lot for teaching online and find it useful mainly because most people seem to have it already installed. I find it particularly useful for simple one-on-one tutoring. I have explained how to use Skype with the virtual mixer in the preceding paragraphs. The screen share option is pretty simple as well but requires a couple of steps.
The first step to share a screen in Skype is to find the three dots on the lower right hand corner of the Skype chat screen and choose “Share Screen” from the menu. (See below)
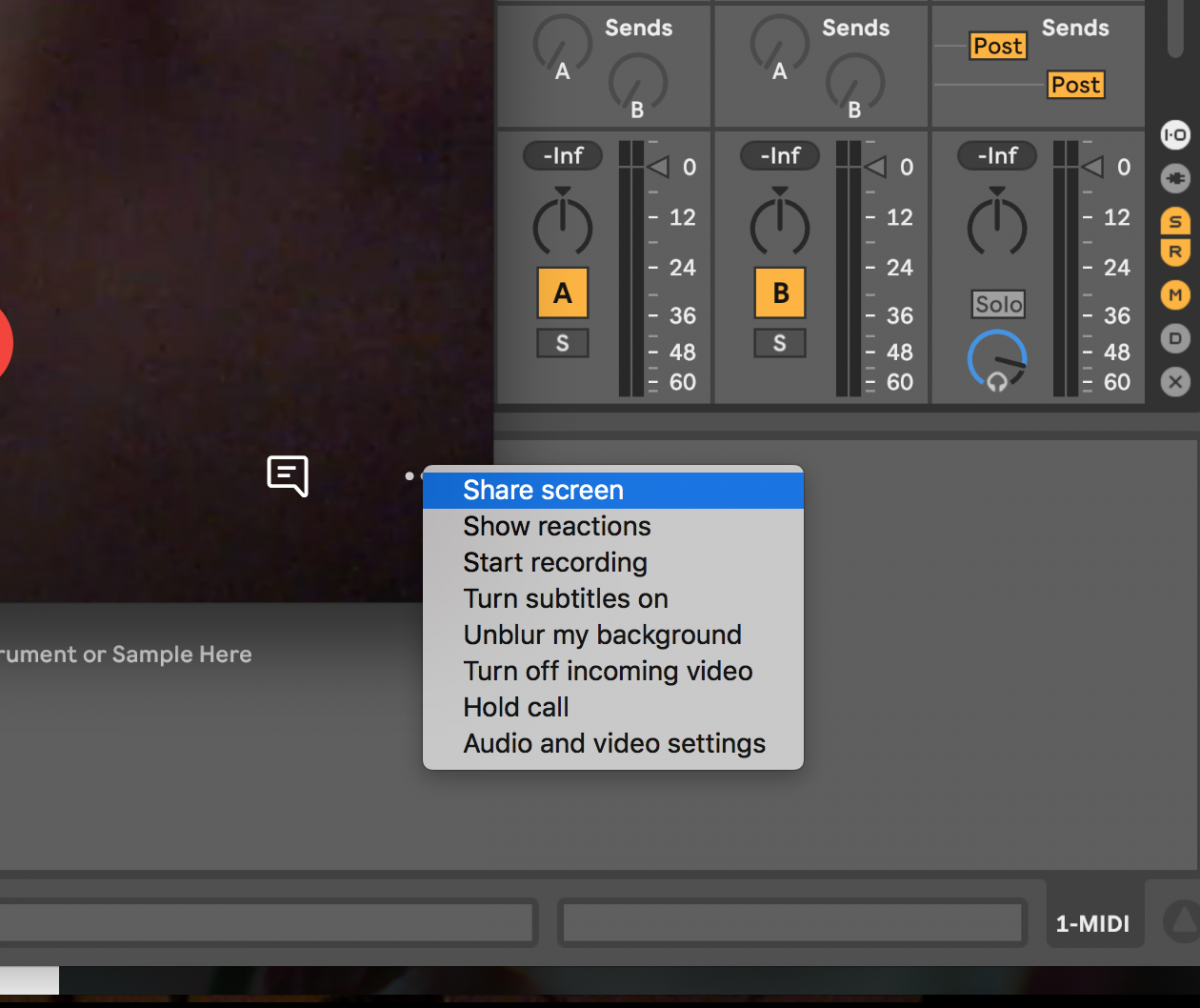
A share screen option will appear. If you want to only share your Ableton Live screen – or whatever application you’re using – select “Share application window” (See below)
The audio quality of Skype is not stellar, but for individual tutoring, it certainly does the job and is quite a stable platform these days.
Google Hangouts: I also have a fair amount of experience with Google chat and used it a bit more years ago when it was much more complex to set up a group chat with Skype. Google Hangouts has two things going for it. Firstly, there is no additional software download required. You simply shoot along a link which will then open up in your browser. It is also quite easy to invite multiple people to the chat. Also, Google hangouts integrate quite nicely with your Google calendar which can especially be great if you are chatting with multiple people at once.
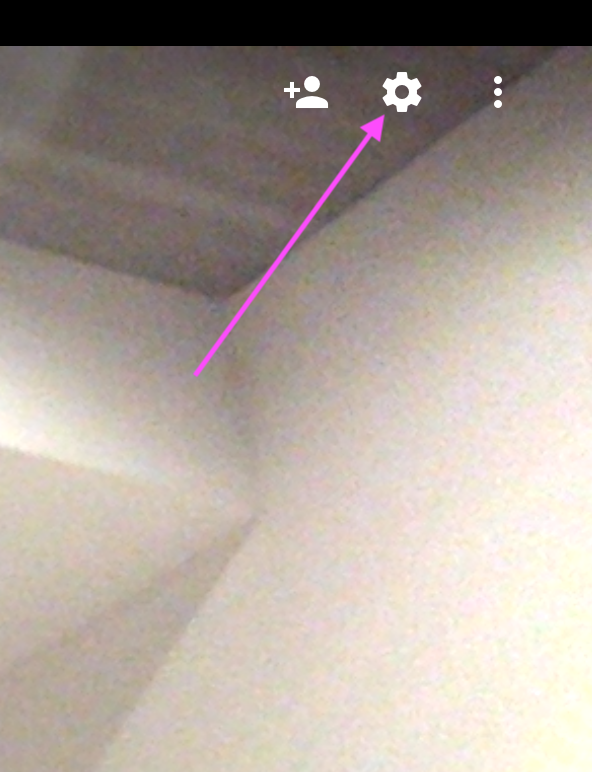
Connecting Google Hangouts to your virtual mixer is quite easy. You first want to select the “Settings” button which is the middle gear-shaped button on the upper right hand corner of the chat. (See below)
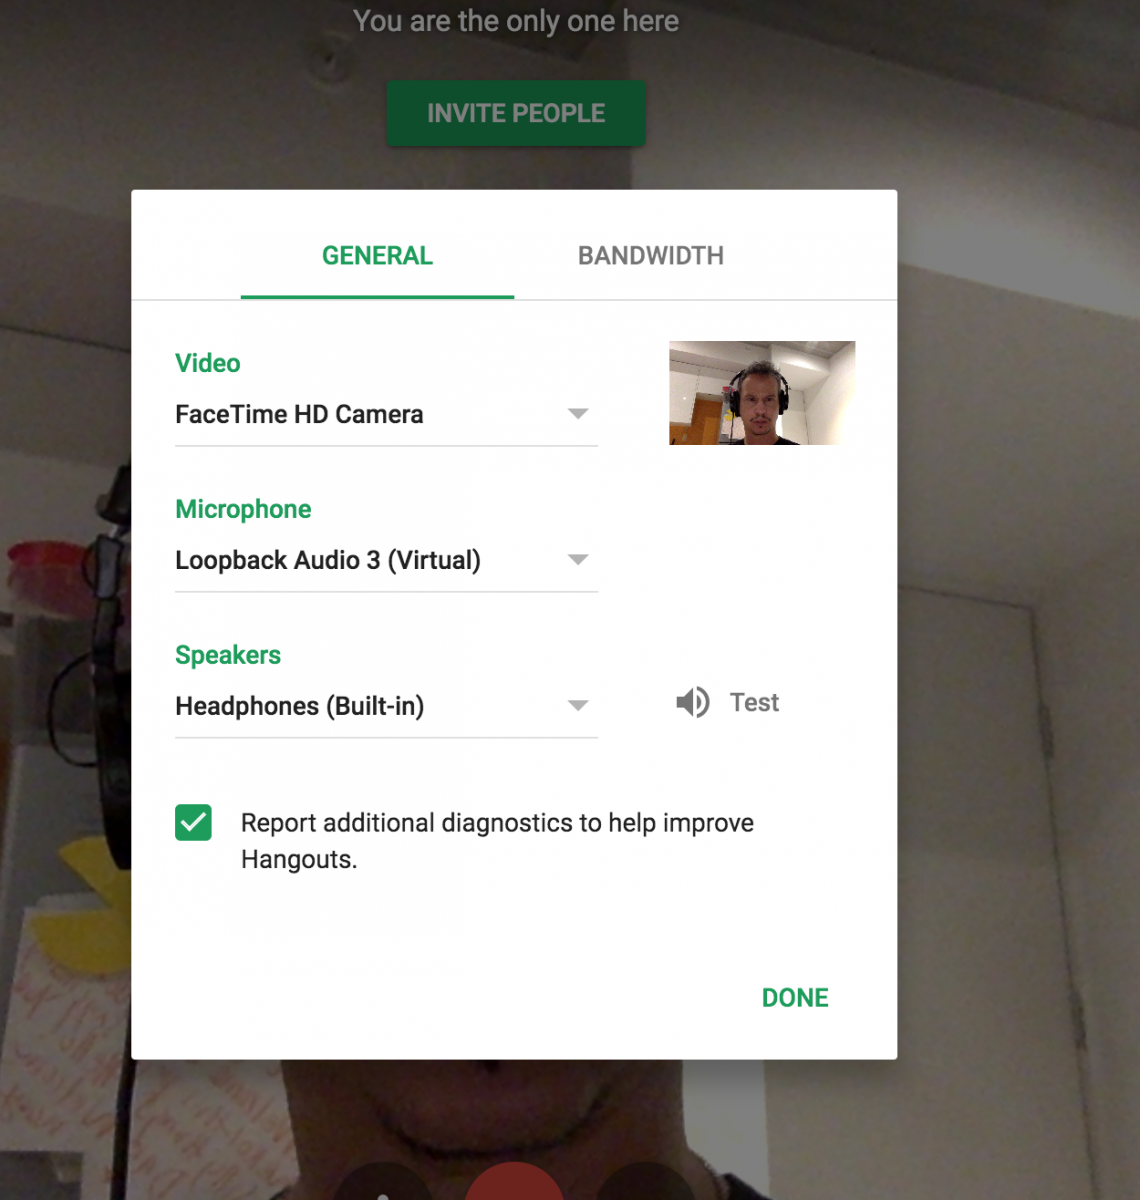
Hitting the “settings” button will open a window which is called “General.” For the Microphone setting simply select “Loopback Audio” and now you will be able to speak and hear Ableton Live’s audio simultaneously. (See Below)
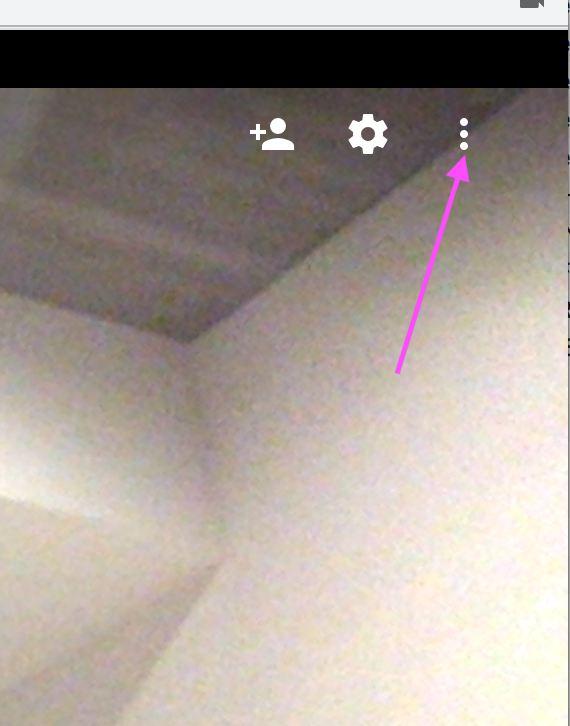
Sharing the screen in Google hangouts is also quite easy. You simply want to select the three vertical buttons on the upper right-hand corner of the screen. (See below)
Once you do that, you will see a menu with a “Share screen” option. You want to select that (see below)

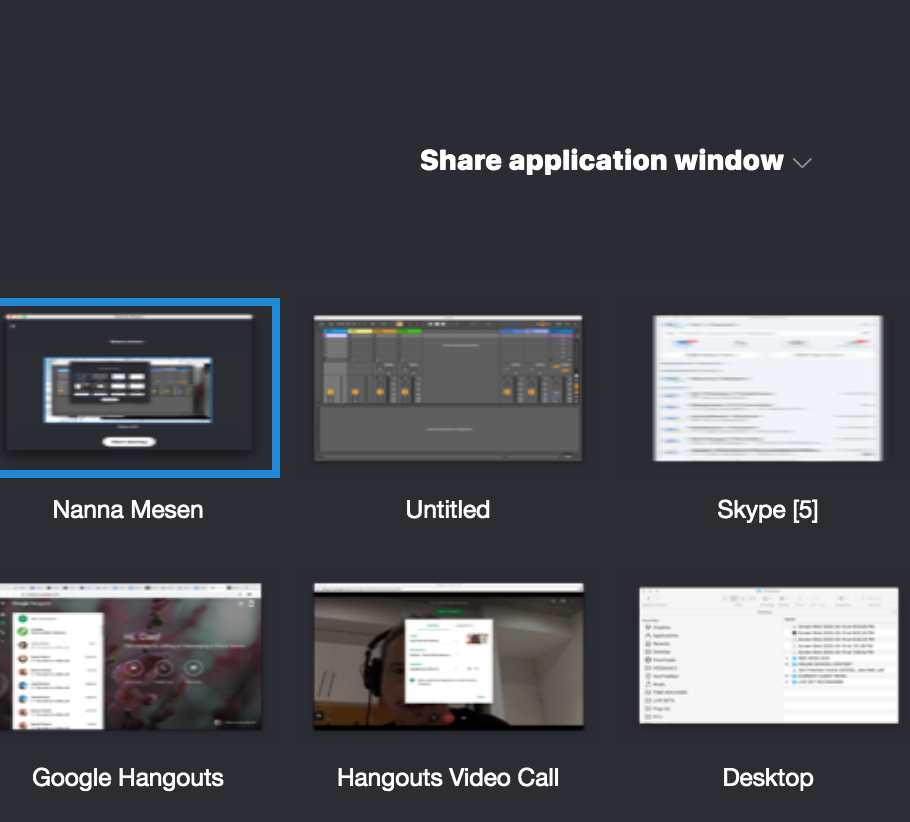
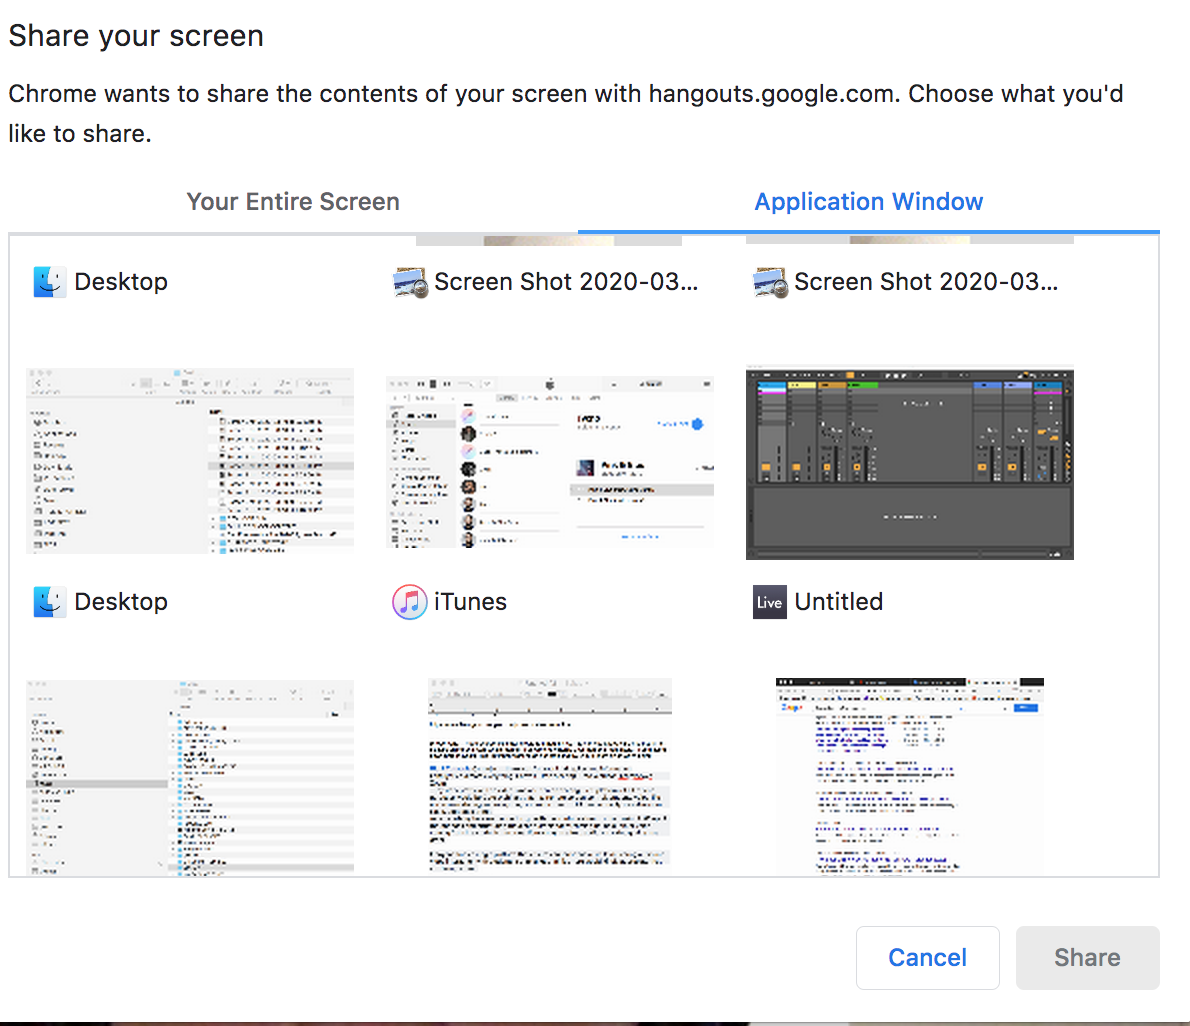
Once you do that, you will again see several options based on what is currently open on your computer. Go ahead and select “Application Window” and then choose the application that you would like your viewers to see. In this case Ableton Live (see below)
Now you can share the application and have sound coming in both from your microphone and Ableton Live.
Zoom: Zoom is the application of choice for the online teaching we’ll be doing at NYU’s Clive Davis Institute of Recorded Music. It is a very powerful tool and the one I’d recommend most highly for actually teaching a class. The drawback about Zoom is that the basic plan which is free can only be used for 40 minutes if you have more than 3 people on the conversation. For one-on-one, however, it can be used indefinitely.
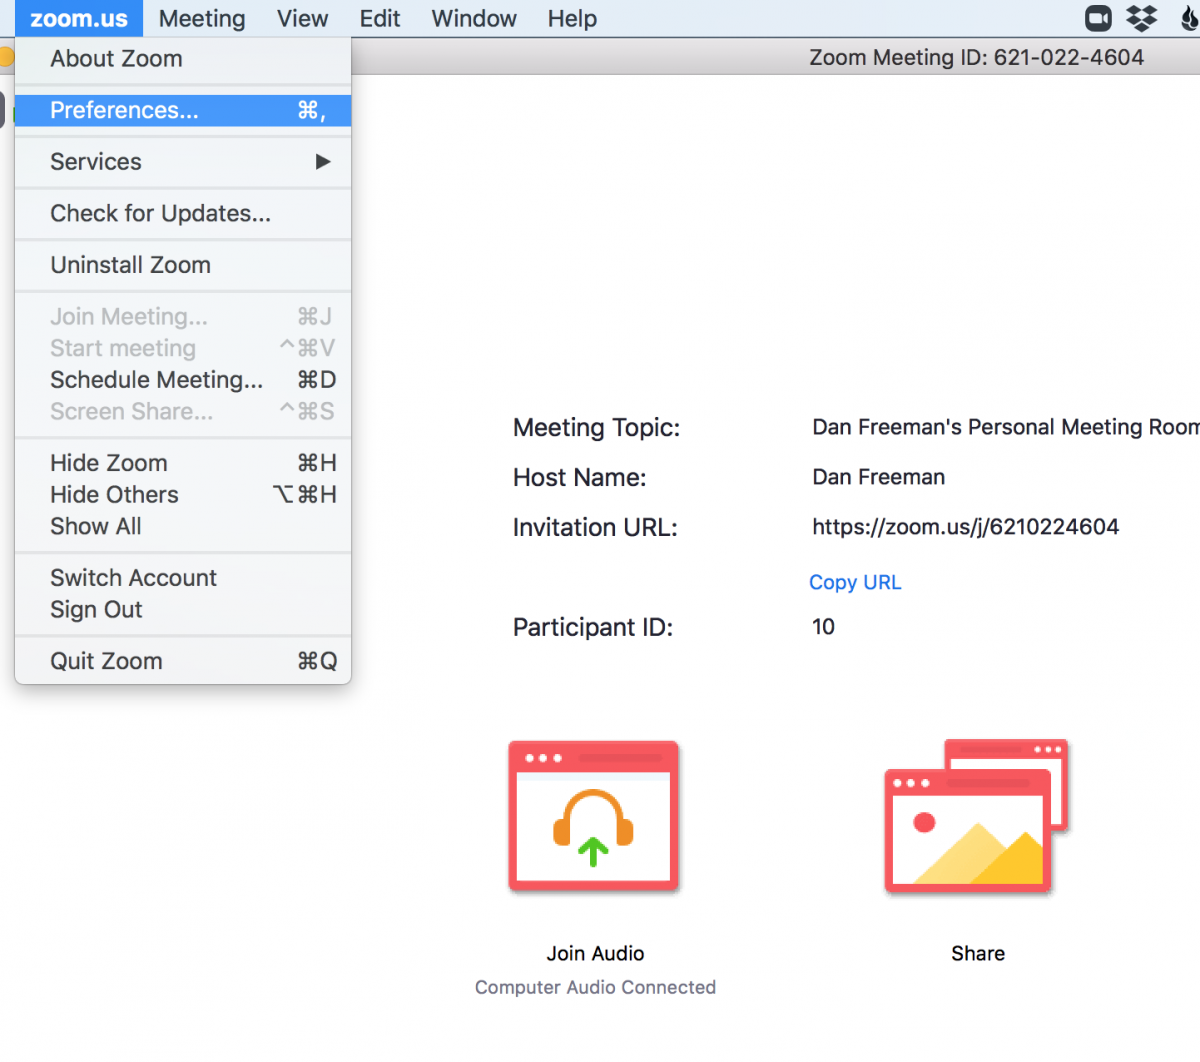
Routing a virtual mixer through Zoom is quite simple. Simply go to the zoom.us tab in the application and select “Preferences” (See below)
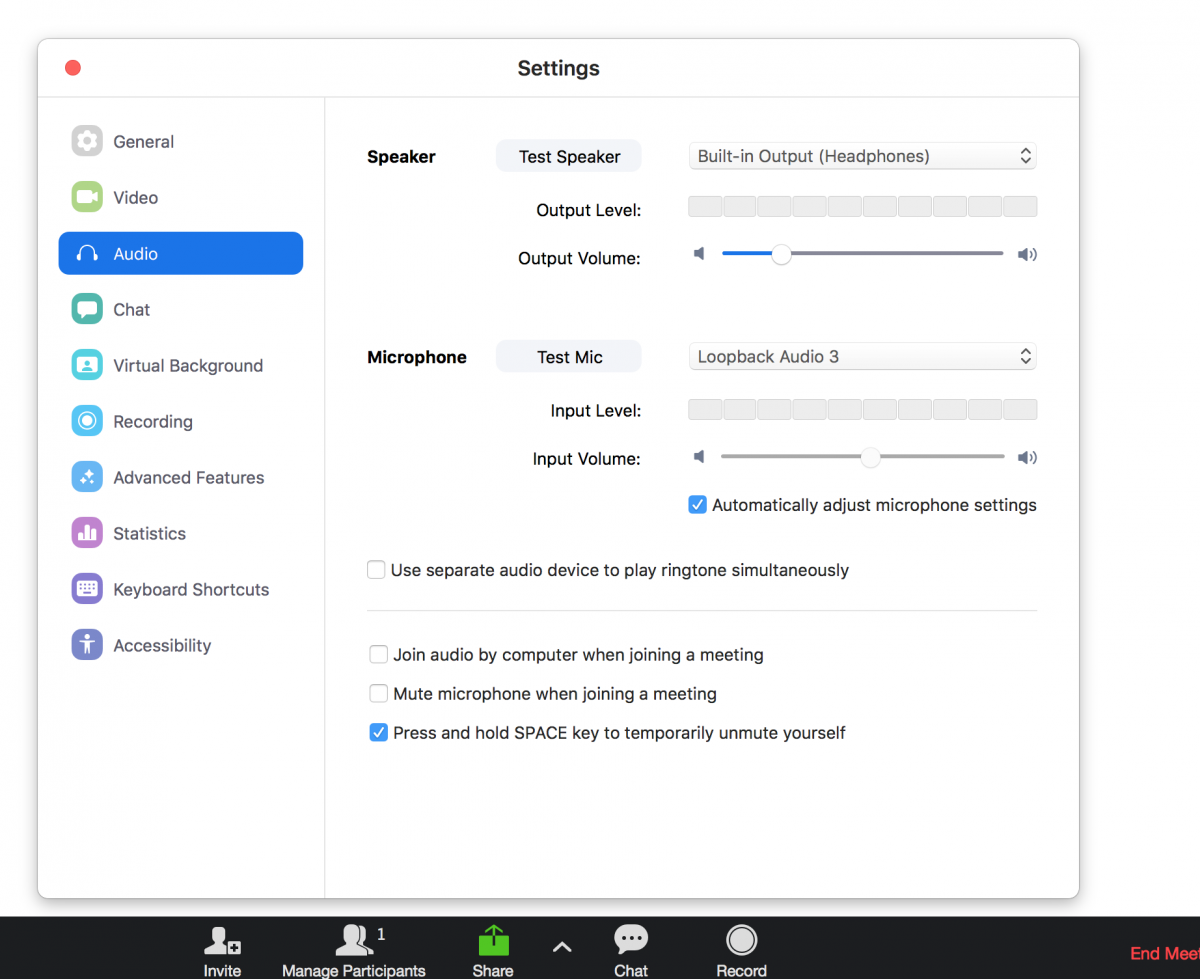
Once you do that, go to the Audio tab and make sure that the Microphone is taking in audio from Loopback and you should now have both your laptop mic and Ableton Live taking in audio.(See below)
Similarly, sharing a screen is quite simple with Zoom. Just select the “Share” button in the middle of your chat screen. (See below)

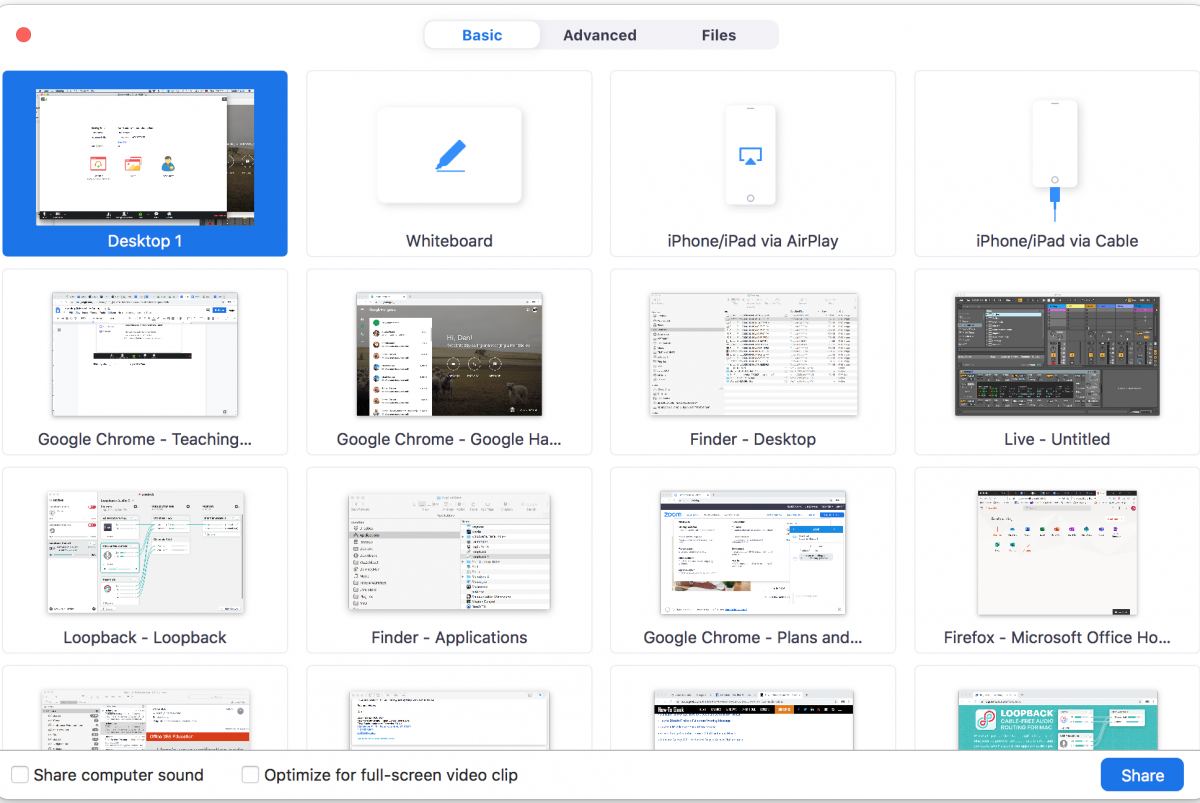
Once you do that, you can select the application you want to share on your screen. Zoom has some nice advanced features as well that let you share a portion of the screen and it is also quite easy to share files. (See below)
I hope this is useful to anyone who’s thinking of teaching music production online, or who is being forced to do so because of the current situation. A couple of last tips about teaching online if you’re going to teach to a class rather than an individual.
Replacing class time with simply a live video, 1:1, is the least interesting way to move online. Try Screensharing plus lecture or conversation; uploading readings or videos with questions students should react to in discussion forums or putting students in groups to create a shared spreadsheet, document, or presentation. These can all be more engaging than just having everyone turn on their cameras for an hour and fifteen minutes.
I hope this has some useful info and stay healthy everyone!
Dan Freeman (CØm1x) is a bassist/producer/Ableton Certified Trainer based in Brooklyn, NY. He’s the Director of the Brooklyn Digital Conservatory and on the faculty of The Juilliard School and New York University’s Clive Davis Institute of Recorded Music
When he’s not in New York City, he direct the music production program and designs curriculum at DJLab in San Jose, Costa Rica.